Skip to content
🌸 SPRING GEL SALE — Up To 30% OFF Gel Polish On Now · 🚚 FREE Shipping Aus-Wide on Orders $150+
🌸 SPRING SALE — Up To 30% OFF Gel Polish · FREE Shipping $150+

Nail Stickers

  • Australian Owned
  • Dispatched in 1-2 Business Days
  • 10,900+ Reviews
  • Afterpay Available

Nail Stickers

  • Gold curve-stripe line nail stickers sheet SW-A24 with abstract squiggles and dots; demo on iridescent chrome tips — NSI Australia
    Silver curve stripe lines nail stickers — abstract squiggle decals for chrome outline nail art, NSI Australia

    Curve Stripe Lines Nail Stickers

    from $3.30

    These Gold and Silver Irregular Curve Stripe Lines Nail Stickers provide a refined detail that elevates any manicure with understated sophistication.

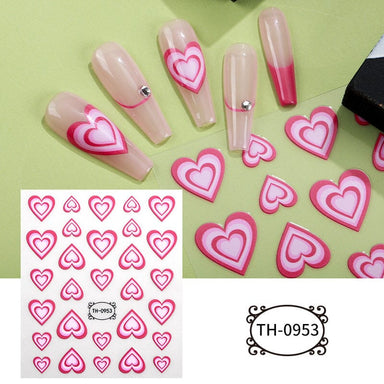
  • Plain hearts nail art stickers pack — black, white & red sheets, mixed sizes (STZ-C024) — NSI Australia
    Plain hearts nail art stickers with manicure example — white hearts on pink nails; STZ-C024

    Plain Hearts Nail Art Stickers

    from $2.95

    These plain heart-shaped nail art stickers in black, white, and red offer an elegant accent to enhance any manicure with subtle charm.

Professional Gel Nail Sticker Options Designed for Speed and Style

Having gel nail sticker options offers a practical solution for those seeking an efficient nail enhancement method. NSI Nails gets that no matter your design goals, you want quality performance that keeps your clients coming back to your salon.

That's why we stock proven NSI systems and a curated range of wholesale nail supplies to meet professional needs. Salons and nail techs with an ABN can apply for a trade account for 15% off.

Professional gel nail sticker systems are designed to streamline detailed work.

Nail art stickers are cleverly designed to fit seamlessly within gel layers. These additions integrate into the enhancement, ensuring that your designs stay flat and never look bulky. Once embedded, they maintain their clarity and vibrancy, lasting long when paired with a compatible top coat.

For nail technicians dealing with high client volumes, pre-formed gel nail sticker designs reduce the detailed brushwork without compromising the precision of the finish. Additionally, flat stickers sit neatly under your top coat without affecting the apex or stress areas of the enhancement.

Beginners also embrace the ease of gel-based design systems. These professional gel nail sticker options offer control, guiding you in correct layering orders without the fear of overwhelming complexity that can get in the way of building your skills and exploring designs.

Material compatibility and system consistency play a key role in long-term wear.

The successful use of gel decals hinges on how they interact with compatible base gels and top coats, and a seamless workflow comes from using products within the same system.

This interconnectedness helps maintain both adhesion and appearance, reducing the risk of lifting and discolouration. As such, professional settings use structured systems for these nail wraps, keeping chemistry and application methods aligned for optimal results.

There’s also flexibility within the cured layer, especially when the natural nail bends or shifts. Longer enhancements need this suppleness to prevent cracks. Plus, choosing quality stickers from a trusted professional brand helps avoid inconsistencies that disrupt the application. Precise thickness and curing are non-negotiable when you apply gel sticker nails, so each lasts as intended.

As for those with sensitivity concerns, HEMA-free systems serve as a thoughtful choice. These systems prioritise gentler ingredients without sacrificing performance. As a professional preparing nails for nail art, you know that being discerning about the ingredients not only speaks to quality service but also builds trust, especially among clients with sensitivities.

We stock products that support fast service and elevated design standards.

Our range includes nail art stickers and products that integrate seamlessly within gel systems.

Each gel nail sticker option is chosen to sit flat under your top coat, ensuring that it doesn't disrupt the balance of your gel layers. This results in a cohesive gel system that boosts your capacity to deliver consistent, high-standard designs without compromising on speed.

In addition, we prioritise time-saving products. These allow technicians like you to work efficiently while maintaining a polished, refined finish that your clients expect with a stick on nail experience.

Seal your stickers under a gel top coat such as Diamond Gel Top Coat Tack-Free, which cures within 60 seconds under an LED lamp or 2 minutes under a UV lamp.

Reordering the same stickers and top coats from one trusted Australian brand helps keep your results consistent, empowering you to maintain client trust.

Strategically located Australian-based warehousing also supports reliable dispatch timelines. Local presence is particularly beneficial for home-based nail technicians who need predictability in managing weekly booking cycles.

We also value education and want the professional nail community to have the information they need to thrive. So, aside from offering stunning products like salon nail stickers, we also have tons of online resources, from blog articles to step-by-step demos, that you can check out. We even have courses for nail technician training, so that you have the opportunity to upskill and reinforce your expertise.

Nail your technique.

If you’re looking to stay ahead in a competitive market, NSI Australia offers high-performance solutions, from gel nail kits to nail buffers and beyond. Our essentials are tailored for professional technicians aiming to streamline operations and enhance client satisfaction.

NSI has been developing professional nail formulas since the 1950s, when founder Dr Fred Slack created the first acrylic nail. NSI Australia stocks those proven systems locally, dispatched from our Gold Coast warehouse, so you get salon quality without waiting on overseas shipping.

Treat yourself to new, locally stocked nail products today. Buy gel nail stickers in Australia now.

Tips to make nail art stickers last longer

With the right care and must-have products from NSI Australia, you’ll keep your nail art looking fresh for days. Here are our pro tips to make your manicure last longer:

  • Start with proper prep

Clean, dry nails are key. Make sure your nail bed is oil-free and lightly buffed before applying your stickers. This helps them grip better and stay put.

  • Always seal the design

A clear, high-gloss top coat locks in your nail stickers and helps prevent lifting, peeling or fading. Reapply every few days to keep that shine going strong.

  • Avoid soaking your hands in water

Too much water can damage nail decals. Wear gloves when cleaning or doing dishes to protect your mani.

  • Keep your hands and cuticles hydrated

Dry nails can lead to premature lifting. Massage in cuticle oil daily to keep everything nourished and in place.

  • Don’t skip edge pressing

After application, firmly press the edges of each nail sticker with a silicone tool or your fingertip to make sure they’re fully secured.

Unleash your creativity with NSI Australia

Our nail art trays and decals offer limitless styling possibilities. Whether you're going for chic and floral or full-out glitter and glam, you can mix and match to create a look that’s totally you.

  • Use negative space: let your natural nail peek through by placing stickers on a bare or clear base for that cool, minimalist look.
  • Theme it up: go full-on seasonal, holiday or trend-based. Think hearts for Valentine’s, pumpkins for Halloween or stars for that Y2K vibe.
  • Create your own layout: go minimalist with a single feature nail, or deck out all ten fingers with coordinated sticker sets.
  • Try layering: combine different stickers (like florals and foil) to add depth and create your own signature style.
  • Matte or glossy top coats: play with different top coat finishes to change the entire vibe. A matte top coat makes stickers feel chic and editorial, while glossy keeps it classic and shiny.
  • Add texture and depth: take your nail stickers to the next level by topping them with tiny rhinestones or pearls. Place a crystal at the centre of a flower or line pearls along the cuticle for a 3D finish.

How to remove nail stickers effectively

With NSI Australia’s premium nail art tools, removal is just as easy (and satisfying) as application. Protect your natural nails by following these gentle, fool-proof steps:

  • Soak in warm, soapy water: start by soaking your fingertips in warm, soapy water for five to ten minutes to loosen the adhesive.
  • Gently lift the edges: use a cuticle stick or orange wood stick to softly lift a corner of the sticker. If it resists, soak a little longer.
  • Peel slowly: once the edges lift, gently peel the sticker off from the side, and never rip or force it.
  • Clean up any residue: use a little nail polish remover to wipe away leftover glue.
  • Moisturise after: finish with cuticle oil and hand cream to rehydrate your nails and skin.

Nail Stickers FAQs

Gel nail sticker art and traditional nail art are both fun ways to create beautiful, long-lasting nails.

Gel stickers are quick and easy to apply, with ready-made designs that look neat and uniform across every nail. Traditional nail art, done with polish and brushwork, gives you more freedom to customise with hand-painted details and unique accents.

Both have their own benefits, and you can even combine them for the best of both worlds. In the end, it all comes down to design preferences and the final look your client is aiming for.

If you have structure concerns, know that correct layering with compatible systems preserves nail integrity. When placed as part of a cohesive system, they avoid interfering with crucial areas like the apex or stress points. You protect the nail’s strength and shape, ensuring the enhancement remains stable and robust.

You can check out our fingernail strengthener products that help preserve nail health. We also have resources on proper nail prep and priming techniques.

Yes. For those still developing their skills, gel nail stickers for beginners serve as an approachable entry point into nail art design.

They offer control over the design elements and provide a simpler avenue to achieve intricate finishes that would be challenging with brush techniques alone. When focusing on the correct order of layering, beginners and nail tech students can bolster their understanding of gel systems while producing polished results.

Apply over a cured layer, not a wet one. Peel the sticker, place it with tweezers or a rubber-tipped tool, press it down from the centre outward so no air is trapped, then trim or file away anything overhanging the free edge. Seal the whole nail with top coat and cure.

Gel stickers do, because they are a semi-cured gel and only harden under a lamp. Standard adhesive stickers and water decals do not, though they still need a top coat over them to last. Check the product page if you are unsure which type you have.

Sealed properly under gel top coat, they last as long as the set does, so two to three weeks. On natural nails with an air-dry top coat, expect closer to a week. The top coat is doing most of the work.

Remove them the way you remove the gel itself: file the shine off the top coat so the acetone can get in, then wrap for 10 to 15 minutes and the sticker comes away with the gel. Do not pick them off, because the sticker takes a layer of nail plate with it. For stickers on natural nails without gel, see the removal steps further down this page.

Yes, and it is the most reliable way to use them. Cure your colour, wipe the tacky layer, place the sticker on the cured surface, then seal with top coat and cure again. The sticker ends up sandwiched between two gel layers, which is why it lasts.

Usually the sticker is overhanging the free edge or touching the cuticle, so it has an edge to catch on. Trim it just inside the nail, and make sure your top coat caps right over the sticker edge rather than stopping short of it.

Yes. Clean the nail with a cleanser first so there is no oil, apply the sticker, then seal with a top coat. Without a top coat over the top they will lift within a day or two, whichever type you use.